
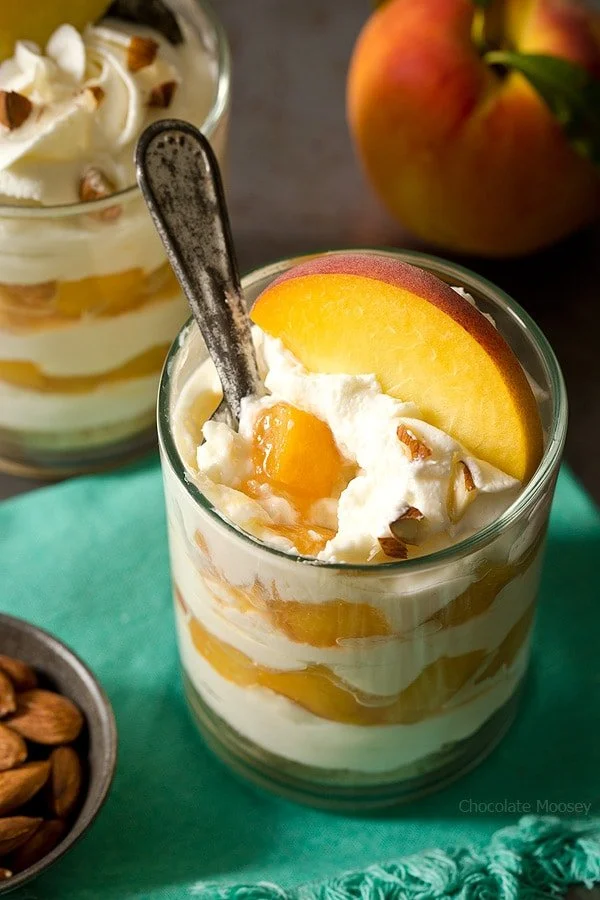
No Bake Peach Cheesecake is a delightful dessert that perfectly captures the essence of summer with its juicy peaches and creamy texture. This recipe is incredibly easy to follow, making it a fantastic choice for anyone looking to create a comforting, no-fuss treat that makes family gatherings feel extra special. Whether you are serving it at a birthday party, summer picnic, or simply enjoying it at home, this cheesecake is sure to bring smiles all around. Join us as we guide you through a step-by-step process to achieve this deliciously fresh dessert!
Ingredients
- 1 cup diced peaches (roughly 1 large peach – peeling optional): Sweet and succulent, the peaches bring a burst of summer flavor to your cheesecake.
- 1 tablespoon granulated sugar: This adds a touch of sweetness to the peaches.
- 1 teaspoon fresh lemon juice: A hint of tartness that balances the sweetness of the peaches.
- 1/2 teaspoon ground cinnamon: Warm and aromatic, cinnamon enhances the overall flavor profile.
- 1/4 teaspoon vanilla extract: Adds a creamy, sweet note to the peach mixture.
- 1/4 cup graham cracker crumbs plus more for garnish: Crispy and crunchy, forming a deliciously textured base.
- 2 tablespoons unsalted butter, melted: Rich and buttery; binds the crumbs together for a perfect crust.
- 1 teaspoon granulated sugar: Extra sweetness for the crust that complements the cheesecake filling.
- Pinch of table salt (omit if using salted butter): Elevates the flavors of the crust.
- 1/4 cup cold heavy whipping cream: Creates a rich and airy texture when whipped.
- 3 tablespoons powdered sugar: Sweetens the whipped cream for a delightful topping.
- 1/2 teaspoon vanilla: Reinforces the creamy flavor in the whipped topping.
- 4 ounces (1/2 block) full-fat cream cheese, room temperature: Essential for a smooth, creamy base; avoid low-fat versions for best results.
- 1/4 cup chopped almonds plus more for garnish: Adds a nice crunch and nutty flavor to the cheesecake layers.
Step-by-Step Directions
For the Peaches:
- In a large saucepan, combine 1 cup diced peaches, 1 tablespoon granulated sugar, 1 teaspoon fresh lemon juice, and 1/2 teaspoon ground cinnamon.
- Bring the mixture to a boil. Then, cook for 5-10 minutes or until the peaches are softened. If you find there isn’t enough liquid, feel free to add a splash of water.
- Once done, remove the mixture from heat. Stir in 1/4 teaspoon vanilla extract and allow it to cool to room temperature.
For the Cheesecake:
- In a small bowl, mix together 1/4 cup graham cracker crumbs, 2 tablespoons melted butter, 1 teaspoon granulated sugar, and a pinch of table salt until combined.
- Press this mixture into the bottom of two glasses or serving dishes to create a crust. Refrigerate while you prepare the filling.
- In a large mixing bowl, beat 1/4 cup cold heavy whipping cream on medium-high speed until it starts to thicken, about 1 minute.
- Gradually add 1 tablespoon powdered sugar and 1/4 teaspoon vanilla, continuing to beat until stiff peaks form, which takes about 2-3 minutes.
- Transfer this whipped cream to another bowl, reserving 2 tablespoons for garnish later. Keep the whipped cream cold in the refrigerator.
- In the same mixing bowl (no need to clean it), beat together 4 ounces of full-fat cream cheese, 2 tablespoons powdered sugar, and 1/4 teaspoon vanilla until smooth and creamy, about 1-2 minutes. Scrape down the bowl as needed.
- Gently fold the whipped cream into the cream cheese mixture until fully incorporated.
- In your prepared glasses, add a layer of the cheesecake filling, topped by a layer of the cooked peaches and chopped almonds. Repeat until all ingredients are used.
- Garnish with the reserved whipped cream and additional chopped almonds. Refrigerate for at least 1 hour before serving. Keep cold until you’re ready to enjoy!
Tips & Tricks
- Make sure the cream cheese is at room temperature to ensure a smooth batter without lumps.
- For added richness, consider folding in some sour cream or Greek yogurt into the cheesecake mixture.
- If you wish to make it lighter, use a mix of cream cheese and Greek yogurt to reduce calories while maintaining creaminess.
- Experiment with different nuts for garnish, like walnuts or pecans, to add unique flavors and textures.
- If you prefer a sweeter cheesecake, adjust the sugar in the peach mixture to your taste.
Serving Suggestions & Pairings
This No Bake Peach Cheesecake is perfect for summer celebrations, birthday parties, or a simple family dessert night. Pair it with a chilled glass of sparkling lemonade or iced tea for a refreshing contrast. You can also serve it with a side of vanilla ice cream or whipped cream for added indulgence. It’s fantastic for picnics or BBQs, as it holds up well and can be made ahead of time.
Nutritional Information
- Calories: Approximately 320 per serving (depending on serving size)
- Fat: 22g
- Carbohydrates: 30g
- Protein: 4g
- Fiber: 1g
Managing portion sizes is key to enjoying this cheesecake while maintaining a balanced diet. It’s rich, so small servings go a long way!
Storing Tips & Variations
Store any leftovers in an airtight container in the refrigerator for up to 5 days. You can also freeze assembled cheesecakes (without the garnish) for up to a month. To reheat, let them thaw in the refrigerator overnight and enjoy them cold.
Experiment with different fruits based on seasonal availability! Try fresh strawberries, raspberries, or even canned fruit in syrup. Adjust the sugar content based on the sweetness of the fruit you choose.
Conclusion
No Bake Peach Cheesecake is a dessert that embodies the spirit of summer and tradition. It is an easy recipe that’s bound to become a favorite among family and friends. We encourage you to try this delightful treat and share your experience. Take photos, and let us know how your cheesecake turned out!
FAQs
1. Can I use frozen peaches for this recipe?
Yes, frozen peaches can be used. Just be sure to thaw them before cooking to achieve the right texture.
2. How long does the cheesecake need to set?
Refrigerate for at least 1 hour to ensure it firms up properly before serving.
3. Can I use low-fat cream cheese?
It’s best to stick with full-fat cream cheese for optimal creaminess; low-fat versions may alter the texture.
4. How can I make this recipe dairy-free?
You can substitute dairy ingredients with non-dairy alternatives, such as vegan cream cheese and coconut cream.
5. Is it possible to make mini cheesecakes?
Absolutely! You can make individual mini cheesecakes by using muffin tins or small cups for serving.
Dive into this No Bake Peach Cheesecake and savor the flavors of delightful summer fruit blended with creamy goodness! Enjoy!
No Bake Peach Cheesecake
Ingredients
Method
- In a large saucepan, combine 1 cup diced peaches, 1 tablespoon granulated sugar, 1 teaspoon fresh lemon juice, and 1/2 teaspoon ground cinnamon.
- Bring the mixture to a boil. Cook for 5-10 minutes or until the peaches are softened; add a splash of water if needed.
- Remove from heat, stir in 1/4 teaspoon vanilla extract, and let cool to room temperature.
- In a small bowl, mix together 1/4 cup graham cracker crumbs, 2 tablespoons melted butter, 1 teaspoon granulated sugar, and a pinch of table salt until combined.
- Press this mixture into the bottom of two glasses or serving dishes to create a crust. Refrigerate while preparing the filling.
- In a large mixing bowl, beat 1/4 cup cold heavy whipping cream on medium-high speed until it starts to thicken, about 1 minute.
- Gradually add 1 tablespoon powdered sugar and 1/4 teaspoon vanilla, beating until stiff peaks form (about 2-3 minutes). Reserve 2 tablespoons for garnish.
- In the same bowl, beat together 4 ounces of full-fat cream cheese, 2 tablespoons powdered sugar, and 1/4 teaspoon vanilla until smooth, about 1-2 minutes.
- Gently fold the whipped cream into the cream cheese mixture until fully incorporated.
- In the prepared glasses, layer the cheesecake filling with the cooked peaches and chopped almonds until all ingredients are used.
- Garnish with reserved whipped cream and additional chopped almonds. Refrigerate for at least 1 hour before serving.


Leave a Reply