
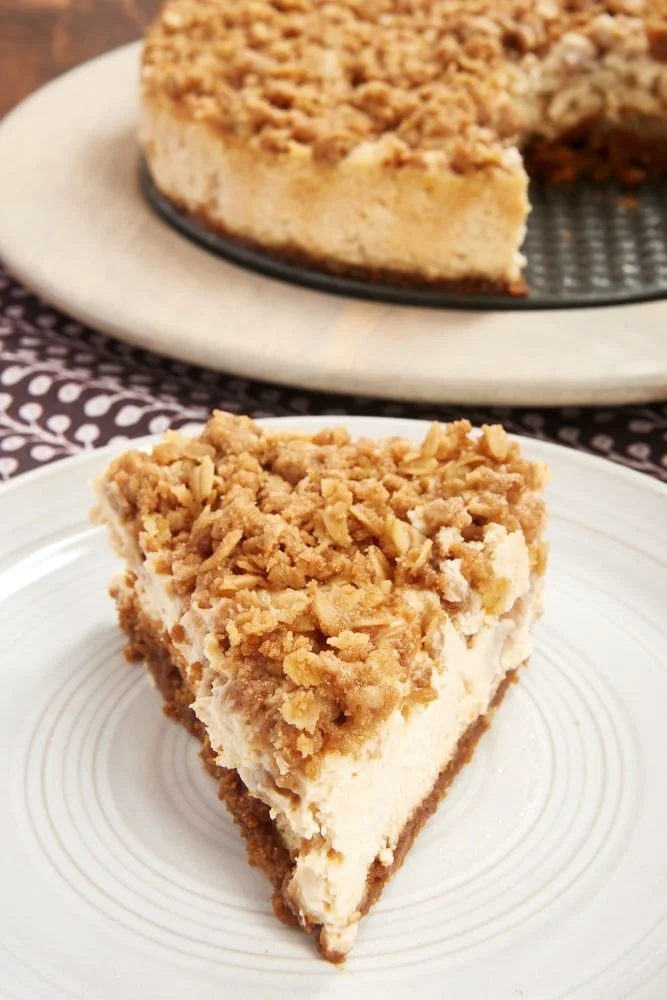
Pear Crisp Cheesecake is a delightful fusion of creamy cheesecake and a crunchy, aromatic pear topping that makes it a must-try dessert. The layers of smooth cream cheese intermingle with the sweet, juicy pears, while the crispy oat topping adds an irresistible texture. This recipe is perfect for celebrations, family gatherings, or simply when you crave something homemade and comforting. Plus, it’s an easy, step-by-step delight that will make your kitchen smell heavenly as it bakes. You’ll want to savor every bite of this elegant yet approachable treat.
Ingredients
To whip up this Pear Crisp Cheesecake, gather the following ingredients for a truly delectable experience:
- 1/2 cup (49g) old-fashioned oats: These oats lend a hearty, chewy texture, enhancing the crisp topping.
- 1/3 cup (40g) all-purpose flour: The flour acts as a binding agent in the topping, contributing to that perfect crumble.
- 3 tablespoons (37g) packed light brown sugar: This sugar provides a hint of caramel flavor, enriching the taste of the crisp.
- 1 teaspoon ground cinnamon: The warm, inviting spice adds depth and an aromatic touch to the dish.
- 1/4 teaspoon salt: A dash of salt balances out the sweetness of the dessert.
- 3 tablespoons (42g) unsalted butter, softened and cut into small cubes: The butter brings richness and moisture to the crumbly topping.
- 2 medium pears, chopped into bite-size pieces (peeled if you prefer): Juicy and sweet, the pears create a fresh contrast to the creamy cheesecake.
- 24 ounces (680g) cream cheese, softened: The star of the cheesecake, this cream cheese delivers a smooth, tangy flavor.
- 1 cup (200g) granulated sugar: Sweetens the filling, counteracting the tanginess of the cream cheese.
- 3 large eggs: They help to set the cheesecake and provide a rich texture.
- 1 teaspoon vanilla extract: The vanilla adds a lovely aroma and deepens the overall flavor.
- 1 teaspoon ground cinnamon: Just a touch for warming flavor in the cheesecake filling.
- 1/2 cup (113g) sour cream: This adds a creamy tang to the cheesecake, making it luscious and velvety.
- 7 ounces (198g) Biscoff cookie crumbs: These crumbs create a unique, spiced crust that’s simply irresistible.
- 1/4 cup (56g) unsalted butter, melted: The melted butter combines with the cookie crumbs to form a perfect crust.
Step-by-Step Directions
Let’s dive into the step-by-step process for crafting this scrumptious Pear Crisp Cheesecake:
-
Preheat the Oven: Start by preheating your oven to 350°F (175°C). This ensures it’s hot enough to bake the cheesecake to perfection.
-
Prepare the Crust: In a bowl, combine the Biscoff cookie crumbs and melted butter until evenly moistened. Press this mixture evenly into the bottom of a 9-inch springform pan. Bake for 15 minutes until set, then remove and let cool slightly.
-
Make the Cheesecake Filling: In a large mixing bowl, blend the softened cream cheese and granulated sugar using an electric mixer set to medium speed until smooth and creamy. Add the eggs one by one, mixing well after each addition. Next, mix in the vanilla, ground cinnamon, and sour cream until fully incorporated.
-
Layer the Cheesecake: Pour the cheesecake batter over your cooled crust, spreading it evenly. Set this aside while you prepare the topping.
-
Prepare the Oat Topping: In another bowl, mix the oats, flour, brown sugar, ground cinnamon, and salt. Use a pastry blender, fork, or your hands to blend in the softened butter until the mixture resembles crumbly bits.
-
Assemble and Bake: Scatter the bite-sized pieces of pear evenly over the cheesecake batter. Then, crumble the oat mixture generously over the pears. Bake in the oven for 15 minutes at 350°F (175°C).
-
Slow Bake: After the initial baking, lower the oven temperature to 200°F (93°C) and bake for another 2 hours and 10 minutes. This slow baking method ensures a creamy center.
-
Cool Gradually: Once the baking time is complete, turn off the oven but allow the cheesecake to sit inside for an additional 2 hours. This gradual cooling process helps prevent cracks.
-
Chill: Finally, remove the cheesecake from the oven, run a knife around the edges, and let it cool completely. Cover and chill in the refrigerator overnight before serving for the best texture and flavor.
Tips & Tricks
- Room Temperature Ingredients: Make sure your cream cheese and eggs are at room temperature for a smoother batter that blends easily.
- Pears: Choose ripe but firm pears to ensure they hold their shape during baking.
- Make Ahead: This cheesecake is perfect for making ahead of time, as it tastes even better after a day in the fridge.
- Serving Warm: If you want a cozy experience, consider serving slices with a dollop of whipped cream while still slightly warm from the fridge.
Serving Suggestions & Pairings
This Pear Crisp Cheesecake is a versatile dessert. Serve it on special occasions like birthdays, holidays, or family reunions. Pair it with a warm cup of spiced chai tea or a rich coffee to accentuate its flavors. A sprinkle of crushed nuts or a drizzle of caramel sauce on top can also elevate the presentation, making it an even more indulgent treat.
Nutritional Information
Each slice (1/12 of the cheesecake) has approximately 350 calories, along with 24g of fat, 27g of carbohydrates, and 6g of protein. This dessert can be enjoyed in moderation, balancing it with healthy meals throughout the day for a well-rounded approach to indulgence.
Storing Tips & Variations
To store, keep the cheesecake covered in the refrigerator for up to a week. For longer storage, you can freeze slices, wrapped tightly in plastic wrap and then placed in a freezer-safe container, for up to 3 months. When ready to enjoy, let it thaw in the fridge overnight. Variations include swapping pears for apples or peaches, experimenting with different flavored cookie crumbs for the crust, or adding chocolate chips to the filling for an extra twist.
Conclusion
Incorporating both the creamy richness of cheesecake and the heartwarming sweetness of pears, this Pear Crisp Cheesecake is a dessert that everyone will love. Don’t hesitate to try this recipe at home and turn it into a family favorite! If you do, please share your experience and let me know how it turned out for you!
FAQs
1. Can I use different types of cheese for this recipe?
While cream cheese is the best choice for texture, you can experiment with mascarpone for a different flavor profile.
2. What can I substitute for Biscoff cookie crumbs?
Graham cracker crumbs or digestive biscuits work beautifully as alternatives if Biscoff isn’t available.
3. How can I ensure my cheesecake doesn’t crack?
Avoid overmixing the batter, and make sure to cool the cheesecake gradually as instructed to help prevent cracks.
4. Can I add other fruits to the cheesecake?
Absolutely! Feel free to mix in blueberries or raspberries with the pears for added color and flavor.
5. Is it necessary to chill the cheesecake overnight?
Yes, chilling overnight allows the flavors to meld together and results in a superior texture, making it easier to slice when served.
Pear Crisp Cheesecake
Ingredients
Method
- Preheat your oven to 350°F (175°C).
- In a bowl, combine the Biscoff cookie crumbs and melted butter until evenly moistened. Press this mixture evenly into the bottom of a 9-inch springform pan. Bake for 15 minutes until set, then remove and let cool slightly.
- In a large mixing bowl, blend the softened cream cheese and granulated sugar using an electric mixer set to medium speed until smooth and creamy.
- Add the eggs one by one, mixing well after each addition. Next, mix in the vanilla, ground cinnamon, and sour cream until fully incorporated.
- Pour the cheesecake batter over your cooled crust, spreading it evenly.
- In another bowl, mix the oats, flour, brown sugar, ground cinnamon, and salt. Blend in the softened butter until the mixture resembles crumbly bits.
- Scatter the bite-sized pieces of pear evenly over the cheesecake batter, then crumble the oat mixture generously over the pears.
- Bake in the oven for 15 minutes at 350°F (175°C).
- Lower the oven temperature to 200°F (93°C) and bake for another 2 hours and 10 minutes.
- Once baking time is complete, turn off the oven but allow the cheesecake to sit inside for an additional 2 hours.
- Remove the cheesecake from the oven, run a knife around the edges, and let it cool completely.
- Cover and chill in the refrigerator overnight before serving.


Leave a Reply