
Peanut Butter Butterfinger Cheesecake is a delightful dessert that combines the rich creaminess of cheesecake with the nostalgic crunch of Butterfinger candy bars and a hint of peanut butter. This recipe draws on comforting flavors that many of us have cherished since childhood, making it perfect for any gathering or a simple family dinner. With its step-by-step instructions, you’ll find this cheesecake easy to make and hard to resist!
Ingredients
To create this indulgent Peanut Butter Butterfinger Cheesecake, gather the following ingredients:
- 22 regular Oreo cookies, their chocolate crunch perfectly balanced by cream filling.
- 5 tablespoons (71g) unsalted butter, melted to add richness.
- 24 ounces (678g) full-fat brick cream cheese, softened to a velvety texture at room temperature.
- 1 cup (200g) granulated sugar, introducing just the right amount of sweetness.
- 3/4 cup (180g) full-fat sour cream (or full-fat yogurt), creamy and tangy at room temperature.
- 1/2 cup (125g) creamy peanut butter, offering a nutty flavor that complements the dessert.
- 2 teaspoons pure vanilla extract, aromatic and sweet.
- 3 large eggs, at room temperature, to bind the luscious filling.
- 12 fun-size or 5 regular-size Butterfinger candy bars, chopped into delightful morsels.
- Optional: 1/4 cup melted peanut butter for drizzling, adding a finishing touch to your masterpiece.
Step-by-Step Directions
-
Preheat the Oven: Start by adjusting the oven rack to the lower third position and preheating your oven to 350°F (177°C). Lightly grease a 9-inch springform pan with nonstick cooking spray and set it aside.
-
Prepare the Crust: In a food processor or blender, pulse the whole Oreos (cream filling and cookie) into a fine crumb. You should end up with about 2 cups (packed) crumbs. In a medium bowl, combine the Oreo crumbs with melted butter. Press this mixture tightly into the bottom and sides of the prepared springform pan. To help prevent leakage, wrap aluminum foil around the bottom and tightly around the outside walls of the pan.
-
Bake the Crust: Place the crust in the oven and bake for 10 minutes. Allow it to cool slightly while you prepare the filling. Keep the oven on for later.
-
Mix the Filling: In a large bowl, use a handheld or stand mixer fitted with a paddle attachment to beat the cream cheese and granulated sugar together on medium speed, mixing for about 3 minutes until smooth and creamy. Next, add the sour cream, peanut butter, and vanilla extract; beat until well combined.
-
Add Eggs: On low speed, add the eggs one at a time, ensuring you beat just enough after each addition until blended. Avoid overmixing after the eggs have been added. Gently fold in three-quarters of your chopped Butterfinger pieces.
-
Prepare the Water Bath: For a creamy texture, wrap aluminum foil around the springform pan. Boil a pot of water, aiming for an inch of water in a large roasting pan. You’ll want a kettle full of hot water to ensure you have enough.
-
Assemble and Bake: Pour the cheesecake batter onto the baked crust, smoothing it with a rubber spatula. Place the springform pan inside the roasting pan and pour the hot water in as needed. Bake for 50-60 minutes, or until the center is almost set.
-
Cooling Period: Once the cheesecake is done, turn off the oven and slightly open the door. Let the cheesecake rest in the oven for an hour. Afterward, remove it and allow it to cool completely at room temperature before refrigerating for at least 6 hours or overnight.
-
Serve: Carefully loosen the cheesecake from the rim of the pan and remove the rim. Decorate with the remaining chopped Butterfinger and drizzle with melted peanut butter. Cut into slices and serve chilled. Store leftover cheesecake in the refrigerator for up to 4 days.
Tips & Tricks
- For an even smoother filling, ensure all your ingredients are at room temperature before you start mixing.
- Don’t skip the water bath; it helps the cheesecake bake evenly, preventing cracks.
- If you’re a true peanut butter lover, consider adding some crushed peanuts on top for added texture.
- Experiment with different kinds of candy or nuts mixed into the filling for a personalized twist.
Serving Suggestions & Pairings
This Peanut Butter Butterfinger Cheesecake is magnificent on its own, but you can enhance the experience by serving it with whipped cream or a scoop of vanilla ice cream. It’s an excellent choice for special occasions, birthday parties, or simply as a treat to brighten your day. Pair it with a cup of coffee or milk for an unbeatable dessert experience.
Nutritional Information
One slice of Peanut Butter Butterfinger Cheesecake contains approximately 350 calories. It provides a delightful mixture of carbohydrates, proteins, and fats, ensuring a balanced bite of rich flavors. As with all treats, moderation is key, so indulge responsibly.
Storing Tips & Variations
Store any leftover cheesecake wrapped tightly in the refrigerator for up to four days. For longer storage, you can freeze slices. Just make sure to wrap them well for up to 2 months. If you’re feeling adventurous, consider substituting the Butterfinger for another favorite candy bar, like Milky Way or Snickers, to personalize this delicious cheesecake even more!
Conclusion
The Peanut Butter Butterfinger Cheesecake is not just a recipe; it’s a pathway to nostalgia and comfort. With its fantastic blend of creamy cheesecake, crunchy Butterfinger, and rich peanut butter, it’s a dessert that invites communal joy. Try making this recipe and share your experience; it might just become a family favorite!
FAQs
-
Can I use low-fat cream cheese or yogurt?
While low-fat options can work, they may change the texture of the cheesecake, making it less rich. For best results, go for full-fat products. -
How do I know when the cheesecake is done?
The center should be slightly jiggly but set. It will firm up as it cools and chills in the refrigerator. -
Is it necessary for the eggs to be at room temperature?
Yes, room temperature eggs blend more uniformly into the batter, helping to create a smooth texture. -
Can I make this cheesecake ahead of time?
Absolutely! This cheesecake can be made a day or two in advance and kept in the refrigerator until it’s ready to be served. -
What can I do if my cheesecake cracks?
If your cheesecake cracks while baking, it’s not the end of the world! You can cover it with whipped cream or chocolate ganache for a beautiful presentation, hiding any imperfections.
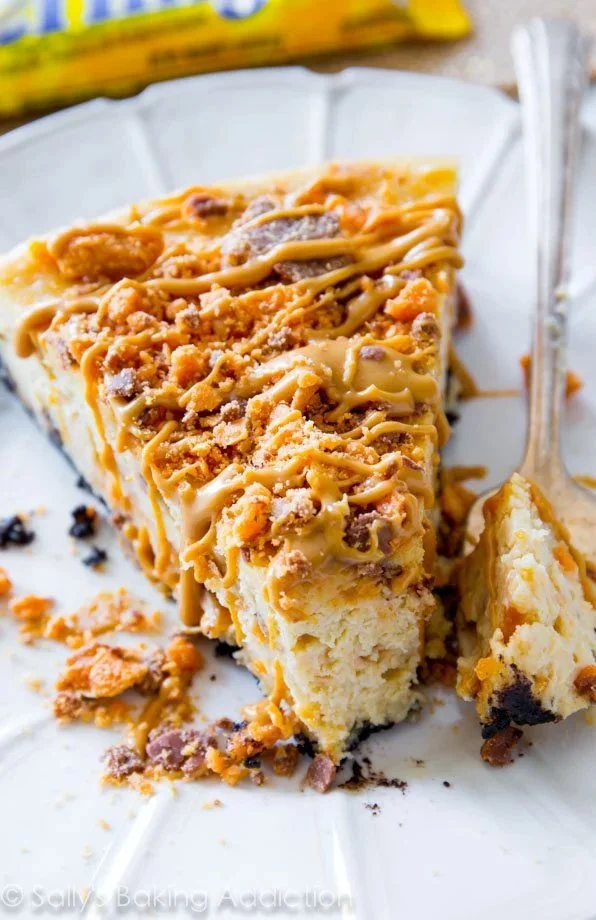
Peanut Butter Butterfinger Cheesecake
Ingredients
Method
- Preheat the oven to 350°F (177°C) and adjust the oven rack to the lower third position. Lightly grease a 9-inch springform pan with nonstick cooking spray.
- In a food processor, pulse the Oreo cookies into fine crumbs. In a medium bowl, mix the Oreo crumbs with melted butter and press into the bottom and sides of the springform pan. Wrap aluminum foil around the bottom and sides of the pan.
- Bake the crust in the oven for 10 minutes. Allow it to cool slightly while preparing the filling.
- In a large bowl, beat the cream cheese and sugar together on medium speed until smooth and creamy (about 3 minutes). Add the sour cream, peanut butter, and vanilla extract, and mix until well combined.
- On low speed, add the eggs one at a time, mixing just enough to blend after each addition. Gently fold in three-quarters of the chopped Butterfinger pieces.
- Wrap aluminum foil around the springform pan and place it in a large roasting pan. Pour hot water into the roasting pan until it reaches about an inch in height.
- Pour the cheesecake batter onto the baked crust and smooth the top. Bake for 50-60 minutes, or until the center is almost set.
- Once done, turn off the oven and slightly open the door. Let the cheesecake rest in the oven for 1 hour. Afterward, allow it to cool at room temperature before refrigerating for at least 6 hours or overnight.
- Loosen the cheesecake from the rim and remove it. Decorate with the remaining chopped Butterfinger and drizzle with melted peanut butter. Cut into slices and serve chilled.


Leave a Reply