
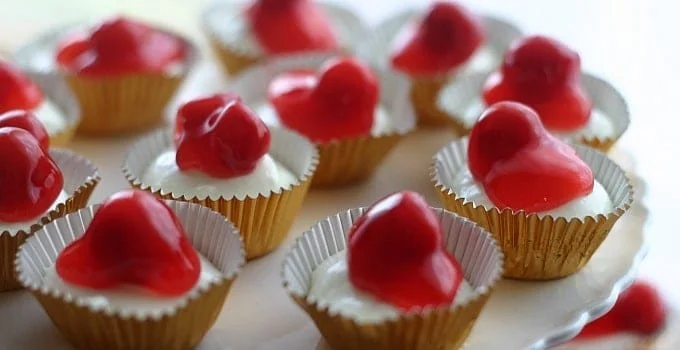
No-Bake Mini Cherry Cheesecakes are the perfect blend of creamy and sweet, irresistibly good little desserts that come together without the need for an oven. Imagine rich, velvety cream cheese mingling with the sweet-tart flavor of cherry pie filling atop a delightful crust made from crispy vanilla wafers—each bite is a mini indulgence that brings comfort and nostalgia. These cheesecakes are incredibly easy to make, ensuring that even the busiest home cooks can whip them up in no time. With their charming presentation, they are family-friendly treats that add a festive touch to any gathering or casual dessert moment.
Ingredients
To create these delightful No-Bake Mini Cherry Cheesecakes, you will need the following ingredients:
- 40 mini (1.25-1.5 inch/3.2-3.8 cm wide) baking cups to hold your individual creations, making each dessert easy to serve.
- 40 mini vanilla wafers, which provide a delicate, crispy base with a touch of sweetness that complements the creamy filling.
- 235 grams (1 cup, 240 milliliters) of very cold heavy cream for that luscious whipped texture that makes these cheesecakes so light.
- 226 grams (1 cup, 8 ounces) of cream cheese at room temperature, providing a smooth and rich filling that melts in your mouth.
- 40 grams (⅓ cup) of powdered sugar to sweeten the filling just right without any grittiness.
- 1 teaspoon of vanilla extract or lemon juice, adding a flavorful depth that enhances the cream cheese.
- ¾ cup (8 ounces) of Cherry pie filling, which can be store-bought or homemade; this juicy topping brings a touch of vibrant color and a burst of flavor, making them truly irresistible.
Step-by-Step Directions
-
Prepare the Baking Cups: Line up the 40 mini baking cups on a sheet pan. Carefully place one vanilla wafer in each cup with the flat side facing down. This will serve as the crunchy base for your cheesecake.
-
Whip the Heavy Cream: Take the cold heavy cream and pour it into the bowl of a stand mixer fitted with a whisk attachment, or use a large mixing bowl if you prefer a hand mixer. Start whipping on medium speed and continue until stiff peaks form—this step is crucial for the perfect, airy texture.
-
Beat the Cream Cheese: In a separate bowl, beat the room temperature cream cheese using a hand mixer until it becomes soft, light, and fluffy. Gradually add the powdered sugar and the vanilla extract or lemon juice, mixing until everything is well combined and silky.
-
Combine the Mixtures: Gently spoon the whipped cream into the cream cheese mixture. Using a spatula, carefully fold the whipped cream into the cream cheese until they are fully combined. This delicate folding method helps maintain the airy texture of the cream.
-
Fill the Cups: Take about 1 tablespoon of the cheesecake mixture and fill each mini baking cup above the vanilla wafer base. Make sure to smooth out the top for an attractive finish.
-
Chill for Serving: If you’re serving the cheesecakes the same day, refrigerate them for at least one hour. Before serving, add a heaping teaspoon of cherry pie filling on top of each cheesecake for a burst of flavor. If you plan to serve them later, store the mini cheesecakes in an airtight container and freeze them. Move them to the refrigerator two hours before serving, then top with cherry pie filling right before enjoying.
Tips & Tricks
- Ensure the heavy cream is really cold before whipping; this helps achieve the best volume and stability.
- For an extra flavor twist, consider mixing a splash of almond extract into the cream cheese mixture.
- If you want a more citrusy kick, adding a small amount of lemon zest enhances the flavor profile beautifully.
Serving Suggestions & Pairings
Serve these No-Bake Mini Cherry Cheesecakes at birthday parties, potlucks, or family gatherings, where everyone can enjoy their individual treat. Pair them with a light dessert wine or iced tea for a refreshing end to a meal. They also make a lovely addition to a summer picnic or any festive event, brightening the atmosphere with their cheerful appearance.
Nutritional Information
Each of these mini cheesecakes contains approximately 120 calories, providing a balance of sweetness and creaminess. The dessert is primarily high in calories due to the cream cheese and heavy cream, so enjoy them mindfully within a balanced diet, especially for a special treat.
Storing Tips & Variations
To store the cheesecakes, keep them in an airtight container in the refrigerator for up to 3 days. If you choose to freeze them, ensure they are covered well to prevent freezer burn. Mini Cherry Cheesecakes can be varied by experimenting with different fruit toppings, such as blueberry or strawberry, and by using flavored cream cheese for a unique twist.
Conclusion
No-Bake Mini Cherry Cheesecakes are a delicious and effortless dessert choice that is sure to delight anyone who tastes them. Their delightful creamy filling paired with the tart cherries on top create a perfect balance of flavors. We encourage you to give this recipe a try and share your own experience. Once you indulge in these charming little treats, you might find yourself making them a go-to dessert for any occasion!
FAQs
-
Can I use a different type of pie filling?
Yes, feel free to substitute cherry pie filling with other fruit toppings like blueberry or peach for a different flavor profile. -
How can I make these cheesecakes dairy-free?
You can use a dairy-free cream cheese alternative and coconut cream in place of heavy cream to maintain a similar texture. -
Can I make these cheesecakes in advance?
Absolutely! You can prepare them a day or two in advance. Just store them in the refrigerator or freeze for later enjoyment. -
What if my heavy cream doesn’t whip up?
Ensure that your cream is very cold; if it’s not whipping, it might be too warm. Another option is to whip the cream in a chilled bowl to help stabilize the process. -
Can these be made gluten-free?
Yes! Simply use gluten-free vanilla wafers to ensure that this dessert is suitable for a gluten-free diet.
Give this recipe a go, and you’ll see just how easy and delicious homemade treats can be!
No-Bake Mini Cherry Cheesecakes
Ingredients
Method
- Line up the 40 mini baking cups on a sheet pan and place one vanilla wafer in each cup with the flat side facing down.
- Pour the cold heavy cream into a stand mixer bowl or a large mixing bowl and whip on medium speed until stiff peaks form.
- In a separate bowl, beat the room temperature cream cheese until light and fluffy. Gradually mix in powdered sugar and vanilla extract or lemon juice until well combined.
- Gently fold the whipped cream into the cream cheese mixture until fully combined.
- Take about 1 tablespoon of the cheesecake mixture and fill each mini baking cup above the vanilla wafer base, smoothing out the top.
- Refrigerate for at least one hour. Before serving, top with a heaping teaspoon of cherry pie filling.


Leave a Reply